Fishing Gear That I’m Interested In for the 2022 Season…

Right out of the gate I will state that I don’t NEED any new rods or reels. These are purely WANTS/WISHES…(this statement WILL come back to haunt me!) And I am not saying that I will purchase any of these items, I’m just curious about them. I’m sure my wife is biting her fingernails and worrying because she knows I tend to “gear up” during the winter months in preparation for the upcoming season. But these are a few items that have piqued my curiosity…

Daiwa 2021 Presso LT reel

First up is the new Daiwa Presso LT reel. This is the “update” to the Daiwa 2017 Presso LTD series. Unfortunately this reel is no longer made in Japan but has been outsourced to China. I like the idea of the monocoque body and I really like the color scheme of this reel. It seems to be a bit more muted compared to the Presso LTD 1025 that I own. Bearing count (12+1) is the same so it should be smooth. The 2021 Presso LT 1000S-P weighs 145grams(5.1oz) while the Presso LTD 1025 weighs in at 155grams(5.47oz). A 10gram difference. Probably too minor to really notice.

Tenryu Rayz Integral RZI50UL-4

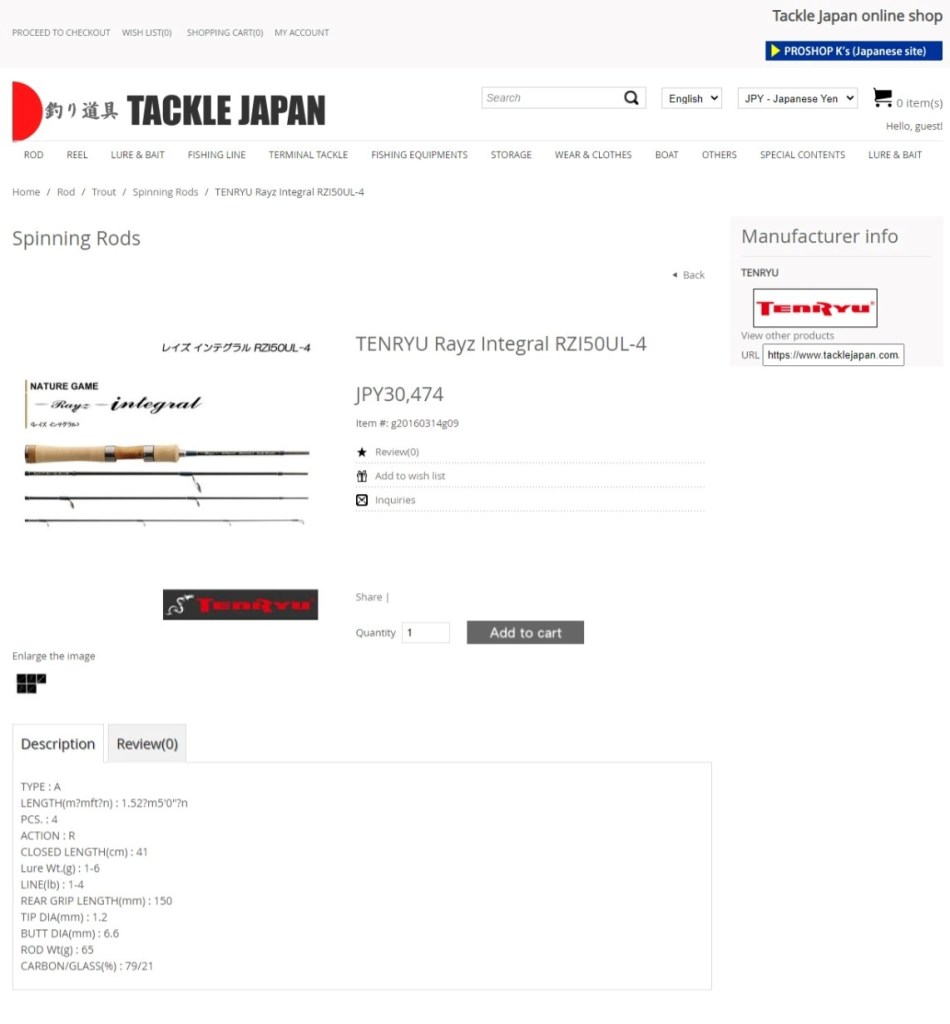
I have a “thing” for multi-piece rods since it suits our style of fishing. I was curious about the next level of these style rods and looked to Tenryu for an option. I own a Tenryu Lunakia 610 and know that they make high quality rods. This Rayz Integral is definitely a contender.

Timon TCC-S62L

I know nothing about Timon rods but this one interested me especially at this price point. I have yet to buy a bad JDM rod. A rod worth considering.

Smith Multiyouse TRMK-504UL

I hear great things about Smith rods so I thought I’d take a look at their offerings. Again, this is obviously a multi-piece rod and seems quite interesting.

NOTE: This is where my wife needs to stop reading this blog post!

If I win the lottery or if money were no object…I would seriously entertain buying this rod. I like the looks. I really like the components, especially the rod guides.

Daiwa Presso LTD SGA SMT 62L. Pie In The Sky!

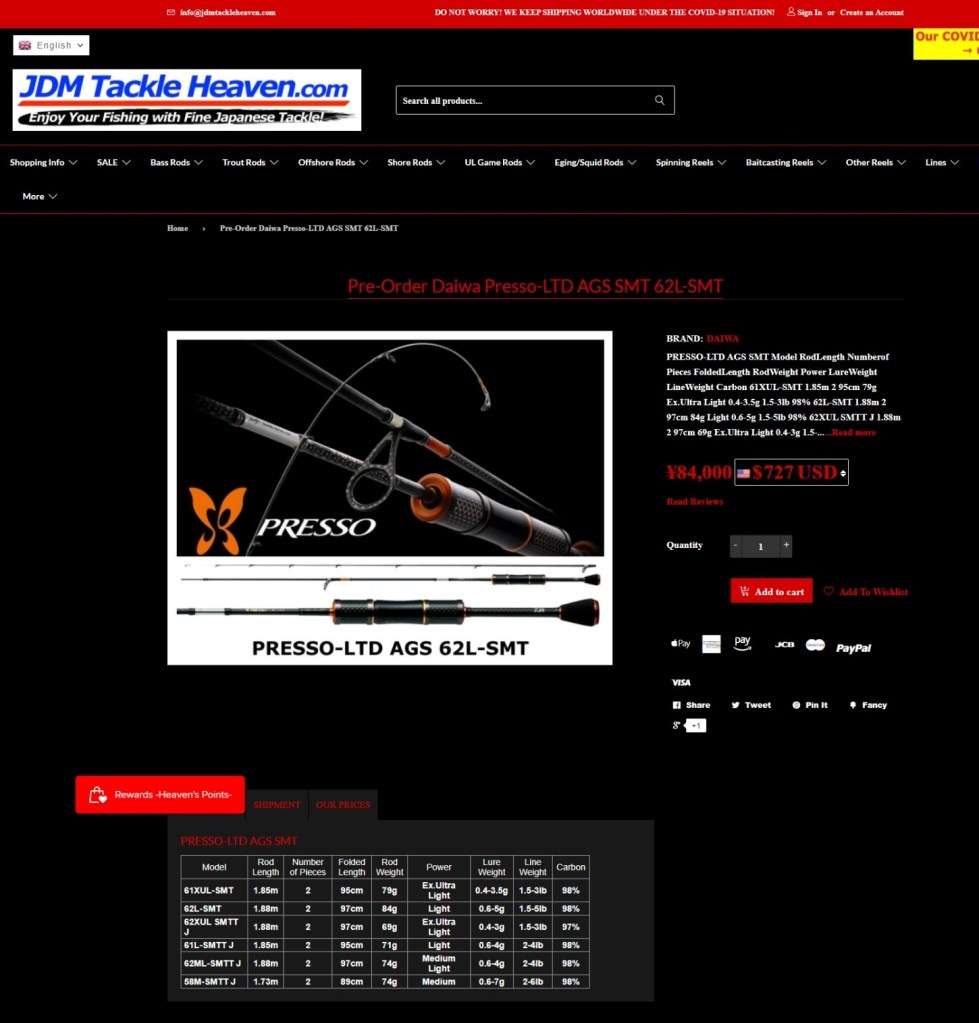
As I’ve said MANY times before, I am curious by nature. And after owning several mid-tier JDM rods, I am wondering what the next level up would be like. But it’s really hard to justify an expenditure of that size. Safer to just drool…

Our Camp Kitchen…

Yes, we used Milwaukee Packout Toolboxes for our Camp Kitchen as well. Told you we loved these boxes! Look at the “bright side”, the boxes are red so it’s hard to misplace or leave them behind when packing up to leave!

The top box is for utensils, dish towels, soap and other bits and bobs.
Keeps things neat and organized. The clear lid is a plus.
Everything is labelled.
Sturdy handle makes it easy to carry.
Everything packed inside.
Pots, pans, plates etc.
Our single burner cook stove.
A very quiet stove. Suited our needs perfectly.
Cheap cook set.
Our skillet
Our GSI 2L kettle for boiling water.
Katadyn Hiker Pro in case we need water when off grid camping.
Our in-camp washing setup. I am a big believer in proper hygiene even when camping.
Collapsible
Ready for transport.

We like the fact that these toolboxes can connect to each other in multiple variations. It really helps keep things together both in camp and during transport. In fact, we stacked all of these boxes on top of one another in the gear room so we know where everything is.

Our Camping Fuel Storage Box…

Currently we use the 1 pound Coleman Propane bottles for our camp stove. We are kicking around the idea of getting a small 5 pound propane tank since it’s a cheaper option in the long run.

I had purchased an extra one of these Milwaukee Packout Tool Boxes because I really like the concept behind them. After finishing the Auxiliary Power Supply Box I was sitting there looking at this other box and was wondering if we could store our 1# propane bottles inside. These boxes come with internal dividers so I put them in place and quickly realized that the propane bottles fit perfectly with room to spare.

Camping Fuel Storage Box.
We love these boxes.

As you can see, there is plenty of room for 5 or 6 of the 1# Coleman Propane bottles as well as a few canisters for our backup backpacking stove (Kovea Spider) and a roll of paper towels.

This little experiment worked well for us. And keeping with the modular approach…it’s easy to transport and keeps the bottles from rolling around or creating clutter by stashing them here and there. By keeping our camping system broken down into separate components it made loading and unloading the vehicle easier for both of us. Before, we used a large Rubbermaid Action Packer to store everything and it was a real pain to get everything to fit and became too heavy for one person to lift.

Food for thought!

Our Auxiliary Power Supply…

Our original plan for this trip was to use a 12VDC refrigerator but bad planning on my part meant if we ordered one it would not arrive in time.

The core of this system is built upon a SOK Battery 12VDC/100A LiFePO4 battery. Yes, it is expensive, but we needed a battery that was rugged, user serviceable and had a depth of discharge that a LiFePO4 battery offers vs a standard 12VDC AGM battery. Our previous 12VDC/100A AGM battery weighed 64 pounds vs 28 pounds for the SOK battery. The SOK is encased in a steel enclosure with a built-in BMS (battery management system) and has 4 replaceable cells inside. I can’t repair a faulty AGM battery.

I chose a Milwaukee Packout Toolbox to house the battery. Below the lid is an XT60 connector so the battery can be charged via solar panels.
I added a BlueSea fuse and a Victron 75/15A MPPT solar charge controller.
This was a smaller Milwaukee Packout Toolbox I used to build a “Breakout Box” for multiple charging options.
I added a dual USB 3.0 port, a switch, another dual USB 2.0 port and a 12VDC cigarette lighter port. When driving the car, I can charge the battery via the cigarette lighter port if needed.
On the other side I added Anderson Power Pole connectors and another XT60 port for various charging options.
Inside the Breakout Box I added a BlueSea Fuse Panel to keep things neat and organized. Each port goes to a separate fuse block. It also holds various charging cables and a Voltaic Sytems USB Touchlight.
Complete unit.
The battery and breakout box are connected via an XT90 connector.

The main benefit for us was a modular approach, lightweight, user serviceable, 80-90% depth of discharge and a rugged build. Not to mention this battery has a 7 year warranty and 4000-8000 charge cycles! 12VDC AGM batteries are heavy and the depth of discharge is commonly quoted at 50% but reading the manufacturers engineering specifications, you will note that a lot of them say that 50% depth of discharge is 12.2 volts.

I am also an amateur radio operator and like to operate in parks and such so I needed the added capability of a bigger battery.

On this trip we brought a laptop to edit photos and videos, the navigation tablet, 2 cell phones and 2 GoPro’s as well as various other USB powered items. I do not like using the main vehicle starting battery to charge things unless the vehicle is being driven so it made sense to bring a separate battery for our charging needs.

We utilized 2 SunPower 50 watt, thin, flexible solar panels while in camp to keep the battery topped off.
The Victron MPPT charge controller had BlueTooth connectivity so I could easily check the charge status on my phone anytime I wanted.

We had all the power we needed or wanted for the duration of the trip. If we decide to get a 12VDC refrigerator in the future I think this battery can handle it.

The battery and breakout box ride behind the passenger seat while the solar panels ride behind the drivers seat. Just like a canoe or kayak, we try to keep the load balanced in the vehicle.

Well, that’s a snap shot of our Auxiliary Power Supply while camping. Maybe it will give you some ideas! Thanks for reading…

An Update on my Simms Boulder Flats Sneakers…

I bought these boots for wet wading back in 2018 and fished them hard for the 2018, 2019, 2020 and now the 2021 season. After countless miles the soles have started to delaminate.

Both boots are delaminating at this location.
The left boot is worse than the right one.

I have looked at buying either the Simms Flyweight boot or the Simms Freesalt boot to replace these. I have used ShoeGoo to fix the heel on the right boot before but it did not hold so I may find a local shoe repair business to see what they can do to fix these. The uppers are holding up really well and the boot is still the most comfortable I’ve worn so I don’t want to give up on these boots or waste money on another pair.

Time to use my Google-Fu and find a local cobbler!

Sand Bar Access on the Cossatot River…

Next stop was the Sand Bar Access and Campground. With it being after 4pm we opted to grab a campsite. There was only 2 other sites taken when we arrived so we grabbed one that was away from everyone else. Again, no running water and only pit toilets for $15 per night. The campsites were spacious but poison ivy was everywhere.

This area also has a Day Use Only Area and it was packed! Apparently it is a favorite swimming hole for the locals and they were everywhere on both sides of the river. With it being our last day, we opted to hang out in camp, cook dinner and get organized for the trip home. We would have preferred fishing this section but there was just too many people around.

It didn’t take long for the campground to fill up with all sorts of people. I’ll never understand why people have to drive through a forest and into a campground with their stereos maxed out. Campground etiquette was out the window! Some guy decided to start chopping wood at 10:30 pm. It literally sounded like he was building a log cabin.

We slept fitfully until 1:30am when some locals in a truck showed up, again with their stereo blasting and were trying to party at the river. Someone at the other end of the campground got up and started screaming at them at which point they promptly turned the stereo off and left. Finally we could get some sleep. NOPE!

From two tent sites away a little girl woke up screaming that she was afraid of the dark! And I do mean SCREAMING! Her mother ended up packing up and leaving.

We slept till 5:30 and packed up and headed home. If I ever camp there again it won’t be during summer. Probably early Spring or Fall.

Again, sticking to our original tenet of exploring new roads and areas, we chose a route home that was off the beaten path. We gathered a lot of new information on this river and thoroughly enjoyed fishing it. We became familiar with the GaiaGPS app which was a definite asset to the trip, especially since we didn’t have cell service for most of our trip. We consider the cost of the upgraded app money well spent. I’m sure we will be back.

I hope you enjoyed this series of blog posts. There will be a few additional “addendum” blog posts to cover some of the gear we used and why. Thanks for reading!

Ed Banks Access Area on the Cossatot River…

With this trip being our first to this river it was tough to fish as much as we wanted to. I’m sure that sounds odd but we wanted to explore as much as we could and considered this trip more of a reconnaissance run than anything. All told, we only covered about 6-7 miles of river. We wanted to get a feel for the place, to see what kind and size of fish we might encounter and to scout out access and camping spots.

The forest roads to the Cossatot River weren’t too bad.

We drove through sections of clear-cut areas and since this is logging country it was to be expected. It was nice to see large swaths had been replanted and were doing well.

Upstream from the Ed Banks Access was a “snot rock boulder fest” and wasn’t a lot of fun. I’m not a fan of snakes and we had seen our fair share. Thankfully none of the ones we encountered were venomous. But where I was, I was on constant alert.

She wanted no part of the upstream side and opted to head downstream. Wiser choice I will admit. After about an hour I joined her on that side and it is much easier. We caught a ton of perch and little Velox. All told we caught 27 fish with one being a nicer smallmouth bass.

DCIM100GOPROGOPR0184.JPG
DCIM100GOPROGOPR0183.JPG

After several hours of fishing some local kids showed up in trucks and on ATV’s. There must’ve been 20 of them and they were rowdy. We decided to move on to another access point we had seen on the map.

Brushy Creek Access on the Cossatot River…

We pulled into the Brushy Creek Access Area at the northern end of the park area and noticed it was Day Use Only. No water and pit toilets but they were nicer than the others we had encountered.

Since we had left before dawn, we pulled out the camp kitchen and stove and made coffee. We talked and decided on which gear to use for fishing this area and suited up.

This is a really nice area as the stream flows through a mountain pass here. I opted to use my fly rod for this section since there was no wind and the river just screamed “FLY ROD.” I used my Loop Evotec Cast 390-4MF and the Hardy Ultraclick fly reel.

In short order I hooked 5 fish and had a blast with the 3wt. Upstream the river changed into a mine field of boulders, slippery rocks and trees, so I broke down the fly rod and strapped it to the Yeti Panga 28 and continued fishing with my baitcast setup. 4ft 6in rods are easier to maneuver with than 9ft rods lol.

We traveled upstream quite a ways until we came to a spot where we would have to swim across to continue. There is a lot of boulder hopping to get to certain fishing spots so if this is not your thing keep that in mind. My fishing backpack is waterproof so swimming/floating across wasn’t a big deal for me but her pack is only water resistant and she didn’t want to attempt the crossing.

A big shout out to the wife here…I get so focused on fishing that I rarely take pictures. If it wasn’t for her…this series would be really short!

After hitting the obstacle, we decided to head back to the car and try another section of the river. On the way back we ran into some locals who were cooling off in the river. We chatted for a bit and continued on our way.

Looking over the map, we opted to drive to the Ed Banks Access Area.

Trials and Tribulations…

We were up before dawn and camp was taken down and loaded into the vehicle in 10 minutes. Off we went.

We drove out of the forest and back to a highway and pointed the car West towards Oklahoma. We enjoy driving the backroads and seeing new scenery so we took a meandering route to get to Pine Creek Lake.

We even found a McDonalds and bought two coffees and a quick breakfast since we left without making either. Gotta have coffee!

We had never been to this part of southeast Oklahoma so were looking forward to seeing what we could. We drove over the Glover River and were stunned to see that the river was bank-to-bank and flowing fast. Really fast! Something wasn’t adding up.

After a long and winding route we finally arrived at the campground only to find the gate locked and a CLOSED sign in front of us. We looked on GaiaGPS and headed for another campground on the lake with similar results. When we drove over the dam we saw that ALL of the gates were open and discharging as much water as possible. Looking around we noticed about 2 feet of telephone poles sticking out of the “lake” with the power lines themselves being underwater. Holy crap! This lake was flooded…the campgrounds were underwater as well.

The Glover River was out of the question at this point. We quickly decided on a Plan B and started driving north towards Talihina Oklahoma. The Talimena Scenic Drive runs from Talihina OK to Mena AR and follows the mountain tops the whole way. We had never done the complete route so decided to do it today.

As we were driving by the Queen Wilhelmina State Park we noticed the campground was pretty empty. And with it being later in the day, we stopped and got a camping spot. The price was $19.89 per night. The real motivator was not time, but the showers we both needed and wanted.

When we checked into the campground, you have to go into the main lobby of the hotel. I guess we smelled really bad because they rushed us through and told us our campsite was #36…all the way at the end of the road LOL.

The plus side to camping here was the altitude. It was roughly 2600 feet so it was 10 degrees cooler. 85F is better than 98F back home! This mountain chain is the first significant barrier to any weather coming up from the Gulf through Texas. We could hear thunder in the valley below and saw dark clouds approaching so we rigged for rain. It never happened. The low that night was 70F so it wasn’t too bad. But it wasn’t the low-60’s like we had at Cossatot.

Needless to say, we were up early and on the road by 6am. We headed to Mena to complete the Scenic Drive and decided to head back to the Cossatot River.